Quality Software at a Reasonable Price
Using the SlideGen Viewer
The SlideGen Viewer
is available as a standalone application, or is launched from within
the main SlideGen application.
The SlideGen Viewer
can be launched from the following locations within SlideGen:
- Quick Show - the Quick Show feature (available from the main window) uses the SlideGen Viewer to generate and show the presentation
- Build Slides Dialog - when building a SlideGen Presentation via the Build Slides dialog, the presentation can be shown in the SlideGen Viewer immediately after generating the slides
- Launch menu - by selecting Go | Launch SlideGen Viewer from within the main window. This launches the standalone version of the SlideGen Viewer.
- From the Windows Start menu - you can launch the SlideGen
Viewer by selecting SlideGen |
SlideGen Viewer from the Windows Start menu, but only if you
have run the separate installer for "SlideGen Viewer Setup" available
from the SlideGen download page.
- By double-clicking SlideGen Presentation
- you can always launch the SlideGen Viewer by simply double-clicking
on
a SlideGen Presentation that you have previously saved to a file.
Below is a sample
screen shot of the SlideGen Viewer:
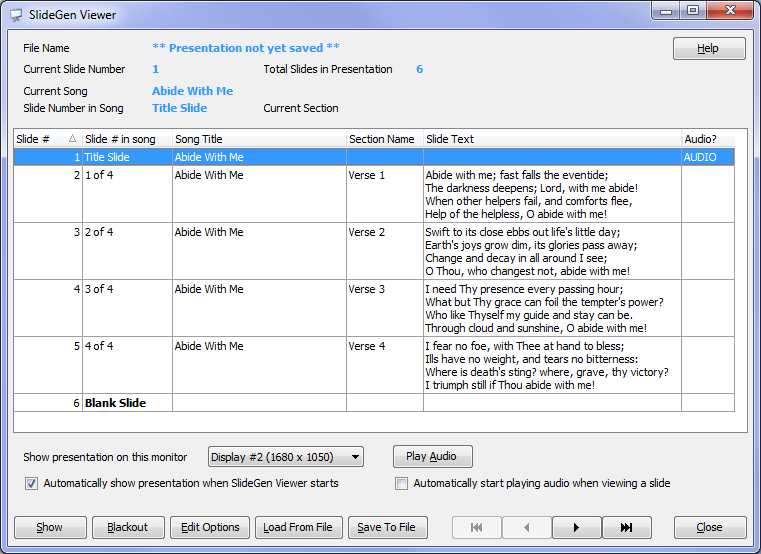
The current slide
can be changed by selecting the appropriate entry in the slide listing
(i.e. the grid listing). The details of that slide are shown at
the top of the screen. A help button is always available in the
top-right, which will bring you to this help page.
You can edit the
lyrics for a slide (e.g. to correct any spelling mistakes, etc...) by
right-clicking on the slide in the slide listing and selecting Edit Slide. You can also hide
a slide by selecting Hide Slide
from this same menu.
If you wish to
automatically show the presentation when SlideGen Viewer starts, you
can select the checkbox "Automatically
show presentation when SlideGen Viewer starts". This will
take affect the next time SlideGen Viewer is launched.
To start showing a
presentation, click the Show
button. See below for details about showing a presentation under
different modes.
To edit the
presentation
options (e.g. background colours, fonts, etc...) click the
Edit Options button.
To load a new
presentation into the viewer, select Load
From
File. To save any changes made to the existing
presentation, select Save To File.
Playing Audio
for a song, including the "Auto Advance" feature
If you launch the
presentation from within SlideGen, you will also have access to the
Audio Track for a song, if one is defined (see Managing Audio Collections for more
details). The "Audio?" column in the grid will say "AUDIO" for
the first slide in a song if audio exists for that song. To start
playing the audio for this song, click on the "Play Audio"
button. Once the audio is playing, the caption for this button
will change to "Stop Audio" - allowing you to stop the audio at any
time.
SlideGen includes
an "Auto Advance" feature for most audio tracks obtained via SlideGen's
Audio Collections tab. Depending on whether this feature is
available for the selected song, when you start playing the audio, one
of two notices will be given:
- "Auto Advance Turned ON" (in green) - this means that SlideGen knows the timings for this song, and will automatically advance the slides for this song at the correct time. After a few seconds, a timer will show, counting down to the next slide change. If you click or move to any slide while this is happening, the "Auto Advance" feature is automaticaly turned off, and you will need to manully advance to each remining slide.
- "Auto Advance Turned OFF" (in red) -
this means
that "Auto Advance" is not available for this song. You will need
to advance to each slide manually, using the various means described
below
If you want
SlideGen to automatically start playing the audio for a song when the
first slide for that song is selected, select the checkbox
"Automatically start playing audio when viewing a slide".
Note: the Auto Advance feature will still work if you've removed
one or more verses for a song within a presentation, but it will not work (will be disabled) if
you've done anything more than that (like add a repeat of a
refrain). When removing verses, SlideGen will drop the
corresponding number of verses from the audio. It does this by
commencing partway through the audio track - e.g. if you've only
selected two out of three verses for a song, SlideGen will start the
audio towards the end of the first verse, and use the end of the first
verse as the introduction.
Singing
will
commence
at the second verse in the audio (even if you've
selected verses 1 and 3 in the lyrics).
Showing the
presentation - single monitor mode
To show a
presentation, click the Show
button. If you only have one monitor (e.g. you are using "clone"
mode on a laptop) then the presentation will fill the entire screen,
and you will not have access
to the SlideGen Viewer window. To operate the presentation, use
the following keyboard shortcuts, or right-click with the mouse
anywhere on the presentation area and select an option from the menu.
Keyboard Shortcuts
- Move to Next Slide - press the Down Arrow, Right Arrow, Page Down, Space Bar, Enter Key, "N" Key or left-click with the mouse
- Move to Previous Slide - press the Up Arrow, Left Arrow, Page
Up, Backspace or "P" key
- Move to Particular Slide - type in the slide number, and then press Enter
- Toggle Blanking of Slide - to
blackout or re-show the slide, press "B" or "." (period key)
- End the Presentation - press the
Escape, End, Pause or "-" key
Showing the
presentation - multi monitor mode
To show the
presentation in multi-monitor mode, make sure the SlideGen Viewer
window is not on the
presentation monitor. Move (drag) it to a different monitor if
necessary. Then select the presentation monitor in the drop down "Show presentation on this monitor".
If
you
are
not
sure
which
monitor
is
which,
find
out via trial and
error. Then click the Show
button to begin the presentation.
You should now have
the presentation itself on one monitor, and still have the SlideGen
Viewer accessible on another monitor. You can control the
presentation by using the keyboard shortcuts above (you may need to
click on the presentation to make it the active window), or you can
control it by navigating the slides using the SlideGen Viewer window.
When using the
SlideGen Viewer you can:
- Move to Next Slide - click the right
arrow button in the button bar to the left of the Close button, or
select the next slide in the slide listing. Note that once you
have selected a slide in the slide listing, you can use the down arrow
on the keyboard to move to the next slide.
- Move to Previous Slide - click the left arrow button in the button bar to the left of the Close button, or select the previous slide in the slide listing. Note that once you have selected a slide in the slide listing, you can use the up arrow on the keyboard to move to the previous slide.
- Move to Particular Slide - click on the desired slide in the slide listing
- Toggle Blanking of Slide - click the
Blackout button
- End the Presentation - click the Hide button
Related Topics
Copyright © 2018 Petrie Software Pty Ltd (A.C.N. 110 519 723) Last Updated: 14 May 2018