Quality Software at a Reasonable Price
Creating a New Presentation
The term
"Presentation" has two meanings with SlideGen. The
two meanings are actually two stages in a logical process:
- A collection of songs. This is a collection of songs that is viewed internally within SlideGen and can be saved for later use.
- A public presentation. This is
the file that results from preparing the above internal presentation
for public use. It can be a "SlideGen Presentation" or a "Microsoft PowerPoint
Presentation".
The above two
stages incorporate a number of steps. Outlined below are the
steps from beginning to end in creating a presentation for use in a
public setting.
Step 1 -
Create Internal Presentation
To begin the
process, you must first create an internal presentation. When you
start SlideGen you will automatically be
editing a new presentation. If you are viewing an existing
presentation you can start a new one from the main window by selecting File | New Presentation from the
main menu, or by clicking the Start a
new presentation button, which is the first button in the
toolbar.
Step 2 - Add
Songs to the Presentation
Next you need to
add songs to the presentation. You can browse for songs in the
Song Catalogue on the left-hand side of the main window by expanding
each folder. Or you can search for songs
by using the search box in the bottom left corner of the main
window.
The search results will appear at the end of the Song Catalogue list.
Once you have found
a song that you want to add to the presentation, simply click on the
song and click the Add Song button which is to the right of the Song
Catalogue (see button circled in red below). You can also add a
song by double-clicking on the song.

Once you have added songs to the presentation, you can adjust the order of the songs in that presentation by using the other buttons underneath the one circled above. Hover the mouse over each button to see what it does. You can remove a song from the presentation, and adjust the order of songs within the presentation.
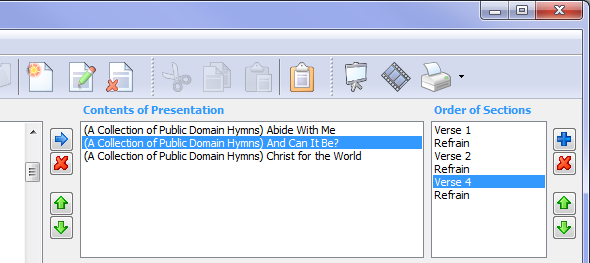
Step 3 - Adjust (if
necessary) the Sections for each Song
Once songs have
been added to the presentation, you may wish to adjust what sections
(e.g. verses) are to be used for that song in this particular
presentation. You do this by using the row of buttons to the far
right of the Order of Sections
list.
In the example
below, the third verse and its corresponding Refrain have been removed
from the hymn "And Can It Be?".
Step 4 - Save the
Presentation
Once you have added
all of the songs to the presentation and adjusted the sections as
appropriate, you should save the presentation. Do this by
selecting File | Save Presentation
or by selecting the button Save the
current presentation in the toolbar.
You will be
presented with the following screen. You should name the
presentation appropriately.
Copyright Management
-- It is vitally important for copyright
management purposes that you specify how this presentation will be
used when you save it. You do this by selecting the appropriate
check boxes which are shown underneath the Presentation Name. In
this example below, we have said that this presentation is going to
used for public projection purposes, and for printing on a song sheet,
but there will be no audio recording made of it.
Note: previously saved
presentations can be deleted from this dialog (or from the Open
Presentation dialog) by right-clicking on a presentation and selecting
"Delete" - or by clicking on a presentation and pressing the "Delete"
key on the keyboard.

Step 5 - Build the
Public Presentation
Now that the
presentation is ready and saved, we can build the public presentation
file. This can be a Microsoft
PowerPoint Presentation, or a SlideGen
Presentation which is shown using the SlideGen Viewer.
See the help on Building the
Slides for a presentation for further information.
Step 6 -
Print a Song Sheet and Song Listing
Printing a song sheet is useful for those people who cannot see the screen - e.g. the platform party or those with poor eyesight. See the help on Printing a Song Sheet for further information.
Printing a song listing is useful so that song leaders and musicians have a list that they can refer to. See the help on Printing a Song Listing for further information.
Related Topics
- Main Window
- Searching for songs
- Copyright Management
- SlideGen Viewer
- Building Slides for Presentation
- Printing a Song Sheet
- Printing a Song Listing
Copyright © 2018 Petrie Software Pty Ltd (A.C.N. 110 519 723) Last Updated: 14 May 2018