Quality Software at a Reasonable Price
Creating a New Song
To create a new
song, go to the File | New Song
menu item on the main window or click
the Create new song button on
the main window's toolbar.
You will see an
empty dialog. The example below is of a song that has already
been created. By default, the song will be created in the folder
that was current when you click New
Song. You may change this by selecting one of the other
folders in the drop down list, and the song will be added to that
folder instead.
If the song has a
number (e.g. a hymn number in a hymnal) enter that number in the Song
Number
field, otherwise leave this field empty.
Specify the title of the song in the Song Title field.
You can also add
some comments in the Comments field. These comments will show in
the main
window when the song is selected.
There are three tabs
in the main area of the song dialog:
- Words Information - this is
where you specify the details about who wrote the words (lyrics) for
the song, and the whether the song is under copyright, and if so, who
owns the copyright. This is also where you can specify a
Copyright Code (or CCLI Song Number) for a song if this song is being
covered by a license
that you have with a third-party licensing organisation (see below for
further details). The copyright status, copyright ownership
details and licensing or permission details will be shown on the
SlideGen or Microsoft PowerPoint presentation, and also on
the Song Sheet. See Managing
your activity for Copyright purposes for further details.
- Music Information - this records the same information as for Words above, except that it is for the music - i.e. author, copyright, licensing, etc...
- Song Sections
- this is where the lyrics of the song is entered (see below for
further details)
WORDS INFORMATION / MUSIC INFORMATION TABS
There are three main states for a song - it is either:
- In the Public Domain - which means you can use it however you like and you don't need to get permission from anyone
- Covered by a License - the song is under copyright, but is covered by a license that you have with a third party licensing organisation - which gives you permission to use the song as long as you report its usage (see Managing your activity for Copyright purposes).
- Permission obtained via other means
- the song is under copyright, but you have been given permission to
use it via some other means - this may be directly from the author, or
via some sort of direct licensing or purchase arrangement with the
author or publisher.
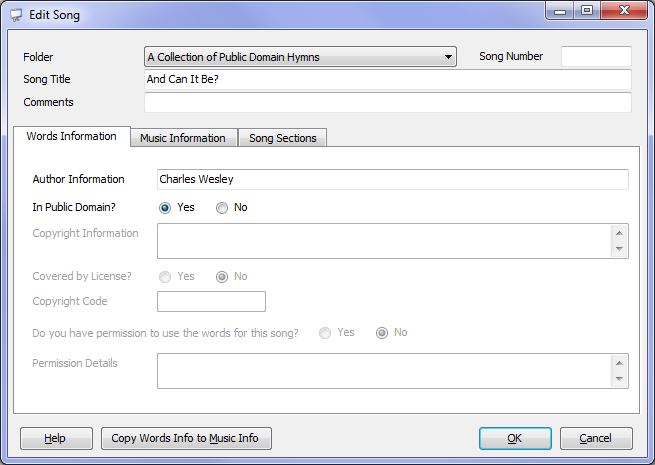
The screenshot above shows a song that is in the public domain. All that is required in a case such as this is to specify the author.
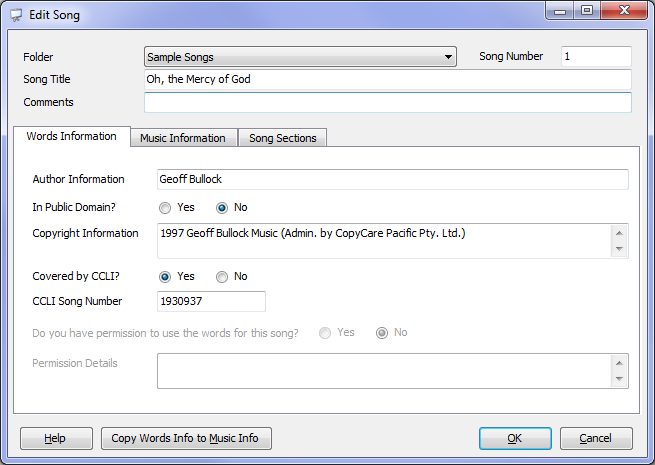
The screenshot below shows a song that is under license. In this case, as well as entering the author information, the copyright information is also entered, as well as the Copyright Code - i.e. the number that uniquely identifies this song within the licensing program that you have subscribed to.
Note: If you have selected CCLI as your third party license provider within Setup Options you will see "Covered by CCLI?" instead of "Covered by License?" and "CCLI Song Number" instead of "Copyright Code". Compare the above screenshot and the below screenshot to see the difference.
Copy Words Info to Music Info - after entering the Words Information, you can copy this information across to the Music Information tab by clicking on the "Copy Words Info to Music Info" button. Once copied, the information can then be modified in either tab as desired.
Finally, the screenshot below shows a song which is under copyright, and permission to use the song has been obtained direct from the author. In this case, details about how permission has been obtained should be entered under Permission Details.

SONG SECTIONS TAB
This is where you enter the lyrics for the song. Below is an example of a complete song:

A song's lyrics are broken up into "sections". A section may be a verse, or a chorus/refrain, or a bridge, or some other arbitrary grouping of lyrics.
To add a new section, click on the New Section button. The following dialog will appear:
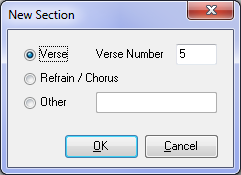
The dialog will try to predict what the next section is that you want to create. If it is not correct, change it to whatever you want. If it is a standard verse, simply select "Verse" and enter the verse number. If it is a Refrain or Chorus, select the "Refrain / Chorus" entry. If it is another sort of section, select "Other" and then type in the name of the section - e.g. "Bridge". Click OK to return to the main song dialog
The new section will now be listed on the left-hand side of the Song Sections tab. An empty area will be in the middle. This is where you enter the lyrics for this section.
On the right-hand side of the Song Sections tab is the Order of Sections list. A section may appear more than once in this list - the classic example is that of a Refrain - the software will automatically insert a "Refrain" section after every verse. You can adjust this, however, by using the buttons to the right of the Order of Sections list. You can add a section to the list (first button), remove a section (second button), or re-order sections (last two buttons). Note that removing a section from this list does not delete the section - it will still be listed on the left-hand side under Sections.
The middle area in the Song Sections tab will always show the lyrics for the section that was last clicked on - whether this was in the "Sections" list or the "Order of Sections" list. To change the lyrics, simply make the changes directly to the lyrics. The changes will be automatically saved when you move to another section or click OK for the song.
To change the name of a section, click the Edit Section Name button. To delete a section, click on the Delete Section button. Both of these functions work on the currently selected section in the "Sections" list only.
Related Topics
Copyright © 2018 Petrie Software Pty Ltd (A.C.N. 110 519 723) Last Updated: 14 May 2018