|

|
 |
Baslogue ®
|
|
SETTING UP THE BARCODE SCANNER
You do not have to use a barcode scanner
in order to use this software. All program features can be used
via the use of a keyboard and mouse. However, in a high-volume
environment where many people may wish to checkout items at the same
time, a barcode scanner can significantly speed up the checkout
process. A barcode scanner also makes the process of returning
items much simpler.
Baslogue®
is
designed to work with a range of barcode scanners. We do not
prescribe particular makes or models. Instead we describe below
the features that a barcode scanner must have, and guide you through
the process of determining whether your particular scanner is
configured correctly for use.
Tests Number 2 and
3 below require you to have Baslogue® installed on your
computer.
You may download and install the software in evaluation mode. You
do not have to purchase the
product before performing these tests. In fact, we highly
recommend that you carry out these tests before purchasing the software, to
ensure compatibility with your chosen scanner. Please perform
each of
these tests, in the following order:
TEST NUMBER 1
The most common
type of barcode scanner acts as a "keyboard wedge". What this
means is that your computer thinks that the scanner is actually a
keyboard, and receives character input from the scanner just like it
was a keyboard.
To work correctly
with Baslogue®, the scanner should return the barcode value,
followed
by a "carriage return" character. This is the default setting for
most scanners. To confirm whether your scanner is currently
configured to do this, do the following:
- Open the Windows
application called "Notepad".
You
will
probably
find this under the "Accessories" menu
inside the Windows Start Menu. You should have a window that
looks something like this:

- Now find an item
somewhere that has a barcode on it. There are so many items these
days that have barcodes on them that you shouldn't have too much
trouble
finding one.
- Once you have
found the item, make sure the Notepad window is the active
window. Confirm this by clicking in the text area of the window.
- Now scan the
barcode on the item that you found three
times. Do not
press anything on the keyboard or use the mouse in between each scan.
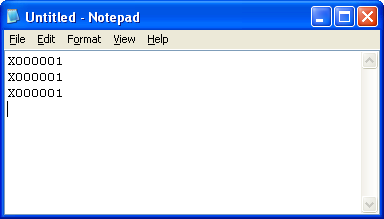
- You should see
the result of your scan in the Notepad window. If the scanner is
configured correctly you should see something like this (the actual
barcode value is irrelevant):
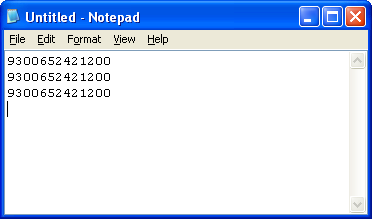
- If your barcode
came out on three separate lines, and the cursor is now waiting at the
beginning of the fourth line, then your scanner has PASSED this
test Proceed to the next test. If it does not look like
above, read on.
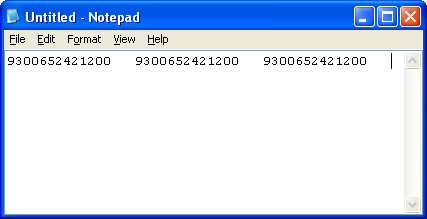
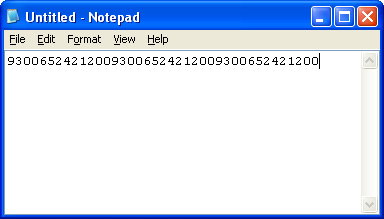
- If you barcode
looks like one of the following, or something else completely
different, then it has FAILED the test:
- If your scanner
failed the test, then you will need to consult the documentation that
came with your scanner, and reconfigure it to send a "carriage return" character at the
end of the barcode value when the barcode is scanned
TEST NUMBER 2
This test ensures that your scanner can read the standard "3 of 9" barcode format (sometimes
also called "Code 39" format)
that is used within this software. If you are going to be using
barcodes that already exist on your items, then you should also
test scanning those barcodes as well. The following steps test
the "3 of 9" format only.
- Install the Baslogue®
software, if it
is not already installed on your computer.
- Launch the
Baslogue® software.
- Go to the menu
option "Reports | Barcode Labels"
- Enter the
following criteria in the dialog box:
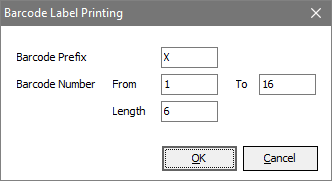
- Select OK.
You will get a report preview, showing a range of barcode labels.
Select the Print button and print this on your printer (you can use
plain paper for this test - you do not need to print on actual labels).
- Now start up a
new Notepad window, just like you did in Test Number 1 above.
- Now scan the
first barcode on the printout you just did. You should see the
following in your Notepad window
- If you see
something like the above, then you have PASSED this test. If so,
proceed to the next test
- If you did not
see anything when you scanned the barcode, then one of two things is
most likely wrong:
- Either the
quality of your printer is not good enough to create a readable barcode
- Or your
scanner is not set up to recognise "3
of 9" formatted barcodes
- It is more
likely to be a printer quality problem, as the "3 of 9" format is a very common
barcode format. Try using a different printer, if possible, or
try increasing the print quality within your printer's settings.
Consult your printer documentation for further details.
TEST NUMBER 3
There are two variations of Cheat Sheet printouts within Baslogue®
that can be used - one using the Code 128 barcode format, and the other
using the Code 39 Full ASCII format. The default is to use Code
128. If for some reason your scanner will not work on Code 128,
try using the Code 39 format. Perform the appropriate test below
for your chosen barcode format. The format to use can be selected
from the Modify
Report Layouts dialog.
TEST FOR CODE
128 BARCODES
This test will check whether your scanner is configured to
recognise the Code 128 barcode format. If your scanner fails
this test try using the Code 39 format (see test below). If you
cannot get either test to work, you
will still be to use the scanner to scan items within Baslogue®
but you
will have to use the keyboard shortcuts noted on the Cheat Sheet
instead of scanning the barcodes.
- Launch the
Baslogue® software.
- Go to the menu
option "Reports | Cheat Sheet".
Select
the
Print
option to print this to a printer attached to your
computer. Use
the
same
printer
that you confirmed as working in Test Number 2 above.
- Now start up a
new WordPad
window. WordPad comes standard with Microsoft Windows
systems, and is found under "Start |
Accessories | WordPad". If you happen to have Microsoft
Word installed then that can also be used.
- Now that you
have started WordPad, change
the font size to Arial 20.
This
will
make
it easier to see the test.
- There are two
different barcodes that you will need to scan. Locate both of
them now before you go any further:
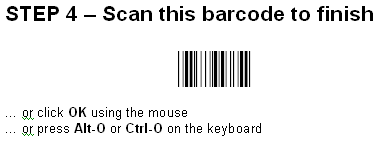
- Barcode #1 -
the barcode you scanned in Test Number 2 above - i.e. X000001.
- Barcode #2 -
the barcode from Step 4 on the left-hand side of the Cheat Sheet:
- Now that you
have located both barcodes, scan the barcodes one after each other in
the following order:
Barcode #1 ---
Barcode #2 --- Barcode
#1
---
Barcode
#2 --- Barcode #1
- You should now
see the following displayed in your WordPad
window:
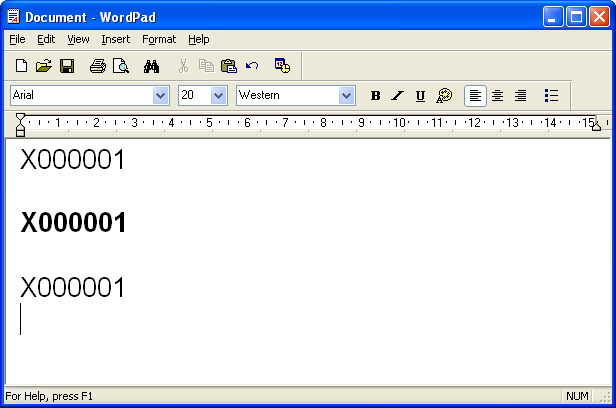
- The important
features that you should see are:
- The value
"X000001" should appear three times, on three separate lines
- There should
be a blank line between each occurance of "X000001"
- The second
value should be in bold, but
the first and third values should be in normal type (i.e. not bolded)
- The cursor
should be waiting at the beginning of the line following the last
"X000001" value
- If this is what
you see, then good. You have PASSED this final test. Your
scanner is ready
for use with Baslogue®.
- If you do not
get the results above, then your barcode scanner may not be configured
for Code 128 barcodes. Consult the documentation
that came with your barcode scanner to find out how to enable scanning
of the Code 128 format.
- For your
information - the barcode that you scanned on the Cheat Sheet under
Step 4 is actually encoded using the Code 128 barcode format to send a "Ctrl-B" character - hence the bold behaviour in this test.
From previous tests, the scanner should already be configured to send a
"carriage return" after each barcode, so the full result of scanning
this code should be to send a Ctrl-B keystroke,
followed
by
a
Carriage Return
(Enter) keystroke.
TEST FOR CODE
39 FULL ASCII BARCODES
This test will check
whether your scanner is configured to
recognise the Code 39 Full ASCII barcode format. If you cannot
get this test to work, you
will still be to use the scanner to scan items within Baslogue®
but you
will have to use the keyboard shortcuts noted on the Cheat Sheet
instead of scanning the barcodes.
- Launch the
Baslogue® software.
- Go to the menu
option "Reports | Cheat Sheet".
Select
the Print option to print this to a printer attached to your
computer. Use
the
same printer that you confirmed as working in Test Number 2 above.
- Now start up a
new Notepad window, just like you did in Test Number 1 above. It
must be a new empty Notepad
window.
- Now for a sanity
check - let's confirm that your version of Notepad works the
same as our version! While Notepad is the active application
within Windows (it should be if you have just launched it) press Ctrl-O on the keyboard (that is the
letter "O", not the number
zero). You should get a File-Open dialog something like this:

- If you do,
good. If you don't, try launching another application that you
have installed (any application). Many applications have a
File-Open command linked to Ctrl-O.
- Now cancel the
File-Open dialog. You should be back to your empty Notepad window.
- Now what we are
going to do is execute the same command, but this time using the
barcode scanner. Find the cheat sheet that you printed out above.
- On the left-hand
side of the cheat sheet, the last step - Step 4 - should look like this:
- By scanning this
barcode, the barcode scanner should send a Ctrl-O just like it would if
you used the keyboard. So go ahead and scan the barcode.
- You should now
have the same File-Open dialog showing that we got above. If you
do, then you have PASSED this final test. Your scanner is ready
for use with Baslogue®.
- If you do not
get the File-Open dialog (for example, you see the characters "$O" scanned instead), you will need
to consult the documentation
that came with your barcode scanner, to find out how to enable control
characters for the 3 of 9 barcode format. This is often referred
to as enabling the "Full ASCII" mode for the Code 39 barcode format.
Related Topics
Return
to
the
welcome page
or Go to the Baslogue Home Page
|
Copyright
©
2009
Petrie
Software Pty Ltd (A.C.N. 110 519 723)
|