|

|
 |
Baslogue ®
|
|
MODIFY REPORT LAYOUTS
A "report" is
something that can be sent to a printer. Baslogue® has
one
built-in report where the layout cannot
be changed:
However, there are
three other reports which can be
customised
by
you to meet your requirements. These are:
There are three
different ways of modifying the report layouts, and they range in
levels of complexity from basic to very advanced. They are:
- Basic Settings tab - here you
can choose from a range of predefined layouts. There are
predefined layouts which cater for "Letter" sized paper (used in the
USA and Canada) and "A4" sized paper (used in the rest of the
world). You can also set some basic information on some layouts
like values for headings and address fields.
- Advanced Settings tab
- here you can modify some finer grain details - such as margins and
column widths. This is useful if your paper does not quite line
up when printing barcode labels or person cards.
- Advanced Designer
- here you can modify virtually anything to do with a report
layout. It is recommended for very advanced users only.
This designer allows you to do things like add a logo image to your
person card, or design a layout for a different arrangement of
barcode
labels.
BASIC
SETTINGS TAB
From the main menu, select "Setup |
Modify Report Layouts". You will get a dialog like the
following where the first tab is the Basic Settings tab:
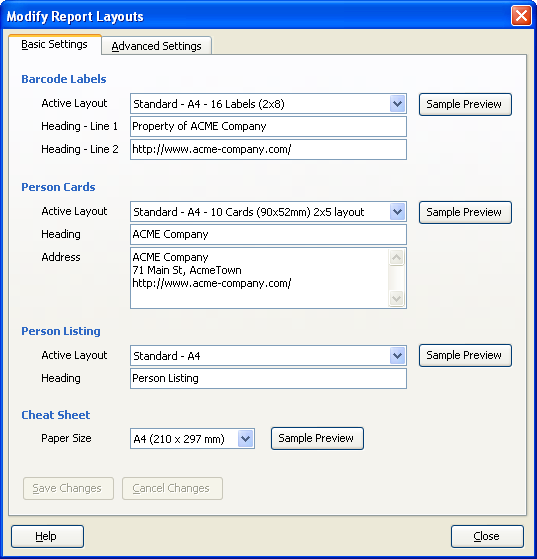
Barcode Labels
- Active Layout - select the desired
layout from the list of available layouts.
- Heading - Line 1 - used by all
"Standard" layouts as its primary heading value
- Heading - Line 2 - used by all
"Standard" layouts as its secondary heading value
- Sample Preview - click this button
to see what effect the changes in the above three fields have
made. You may have to save your changes first by clicking on
"Save Changes" before this button will become available.
Person Cards
- Active Layout - select the desired
layout from the list of available layouts.
- Heading - used by all "Standard"
layouts as its heading value
- Address - used by all "Standard"
layouts to display in the address area
- Sample Preview
- click this button to see what effect the changes in the above three
fields have made. You may have to save your changes first by
clicking
on "Save Changes" before this button will become available.
Person Listing
- Active Layout - select the desired
layout from the list of available layouts.
- Sample Preview
- click this button to see what effect the change of layout above has.
Cheat Sheet
- Paper Size - select whether to use
the built-in "Letter" paper size layout or "A4" paper size layout for
the Cheat Sheet.
- Barcode Type - select which barcode
type to use on the Cheat Sheet - Code 128 or Code 39 Full ASCII
(otherwise known as Code 3 of 9 Extended).
- Sample Preview
- click this button to see what effect the change of paper size above
has.
Other Buttons
- Save Changes - click to save all
changes made on the Basic Settings tab
- Cancel Changes - click to cancel
(roll back) all changes made on the Basic Settings tab since the last
time your saved changes, or since you opened the dialog.
- Help - click to show this help page
- Close - click to close the
dialog. You will be prompted to save any changes that have not
yet been saved on either tab.
ADVANCED SETTINGS TAB
From the main menu, select "Setup |
Modify Report Layouts". Now click on the "Advanced Settings" tab and you will
see a dialog like the following:
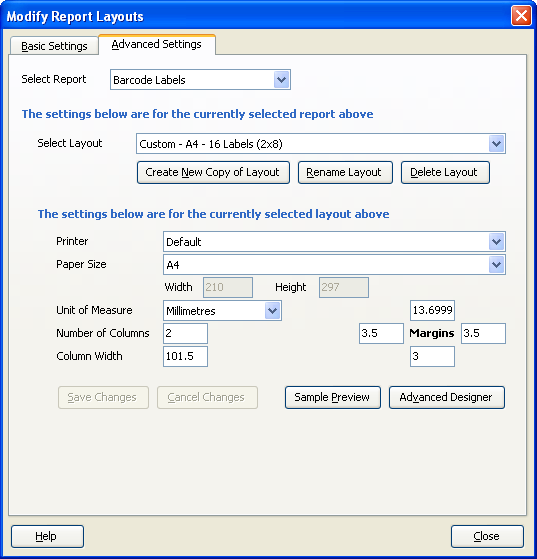
When you first come to
this tab, only the "Select Report" field will be showing. Once
you select a report, the ability to select a layout will show.
Once you have selected a layout, the rest of the fields will show.
Selection Fields
- Select Report - select which type of
report you would like to modify settings for
- Select Layout - select which layout
within the selected report you would like to modify settings for
Layout Selection Buttons
- Create New Copy of Layout - this
allows you to create a new layout based on the currently selected
layout. Simply give your layout a new name, and then you can edit
its settings. Built-in layouts (those named "Standard - ...")
cannot be changed, so you will need to create a new copy of one of the
standard layouts as your first task in order to edit any of its
settings.
- Rename Layout - allows you to change
the name of one of the custom layouts that you have created. You
cannot rename a standard layout.
- Delete Layout - allows you to delete
one of the custom layouts that you have created. You cannot delete a
standard layout.
Settings for Selected Layout
- Printer - you can choose the printer
that this layout should always print to. Usually it is fine to
leave it as "Default", which will print to whatever is your default
printer as defined in your Windows Control Panel. One reason for
changing the printer here, however, is so that extra Paper Sizes become
available that your specific printer supports. Otherwise the
default Windows paper sizes are available in the next field.
- Paper Size - choose the size of the
paper that you will be printing to. The available sizes depend on
the Printer selected in the previous field.
- Paper Width and Height - these
fields automatically default to the width and height that is applicable
to the chosen paper size. You cannot change the width and height
unless you choose the paper size called "Custom". If you choose
"Custom" you can set the width and height to any value.
- Unit of Measure - select whether you
would like to see all measurement values in inches (in) or in
millimetres (mm).
- Number of Columns - select how many
columns you would like the layout to have. Be careful when
changing this value as it will fundamentally affect how the layout is
generated and used. It should be used in combination with the
Advanced Designer functionality.
- Column Width - if the layout
contains more than one column then this field controls the width of all
columns. You can adjust this if the layout is not quite aligning
properly with your stationery.
- Margins (Top, Left, Right, Bottom) -
set the size of the four margins. Changing these value is useful
if the layout
is not quite aligning properly with your stationery. For example,
if your printer is printing 5mm too high on your paper, you can add 5mm to the top margin and subtract 5mm from the bottom margin.
Buttons for Selected Layout
- Save Changes - click to save all
changes made on the Advanced Settings tab
- Cancel Changes
- click to cancel (roll back) all changes made on the Advanced Settings
tab since the last time your saved changes, or since you opened the
dialog.
- Sample Preview
- click this button to see what effect your changes have made.
You will need to "Save Changes" before this button becomes available.
- Advanced Designer - click this
button to enter the Advanced Designer window (see below). You will need to
"Save Changes" before this button becomes available, and this button is
not available for built-in layouts. It is recommended for very
advanced users only.
Other Buttons
- Help - click to show this help page
- Close - click to close the
dialog. You will be prompted to save any changes that have not
yet been saved on either tab.
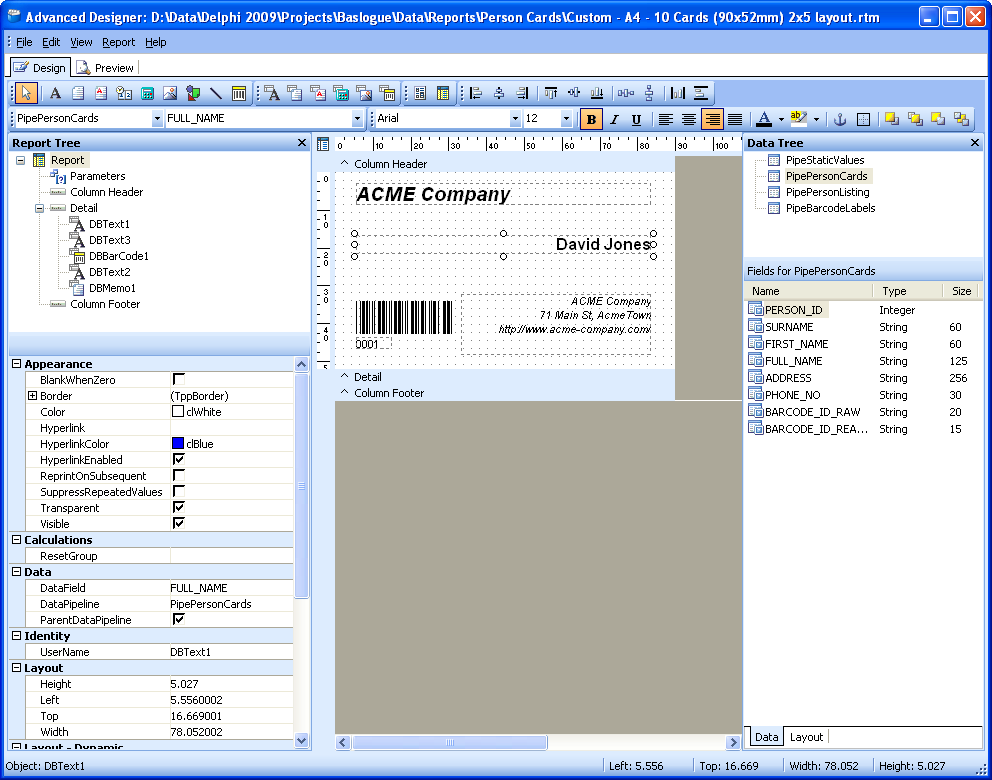
ADVANCED
DESIGNER
From the main menu, select "Setup |
Modify Report Layouts". Now click on the "Advanced Settings" tab. Select
a layout (see above section) and then select the "Advanced Designer" button. You
will see a window like the following.
The Advanced Designer is
recommended for
very advanced users only. It allows you to do things like
add a logo image to your person card, or design a layout for a
different arrangement of barcode labels.
Further help
for the Advanced Designer can be found by selecting "Help | Help Topics" from within the
Advanced Designer window. The integrated help that you will find
here has been developed by Digital
Metaphors Corporation, the developers and owners of ReportBuilder, which we license and
use as our Advanced Designer. This help is useful if you want to
find out more about a particular function.
In addition to the above help, a more comprehensive overview is
available in the form of a PDF file (read using Adobe Reader).
This file has also developed by Digital Metaphors Corporation.
You
can
find this file by selecting "Help - ReportBuilder" from the
"Baslogue" menu within the Windows start menu.
If you have any questions about how to use the Advanced Designer in the
context of Baslogue®, please post a message to our
Discussion Forum.
Related Topics
Return
to
the welcome page or Go to the Baslogue Home Page
|
Copyright
©
2009
Petrie Software Pty Ltd (A.C.N. 110 519 723)
|